Well, the end is getting near! And for some it has already arrived!
The end of the Flowering Snowball-along, of course! Although, even after we have put the last stitch in the binding, you are welcome to continue posting your progress and finished pictures on Flickr!
This quilt-along has just reinforced my love for the Flowering Snowball block. Every quilt-in-progress or finished quilt I have seen on Flickr or on Instagram has been breathtaking!
It is thrilling!
But today we are putting the blocks together and the rows together.
This will be very easy and most of you know how the drill goes without any prompting.
Begin with two blocks....
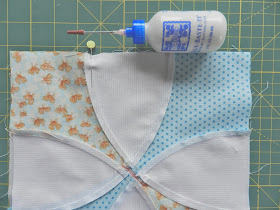
Obviously, the area that is important to match up is the center section where the A/B template pieces meet.
This is just a teeny bit more tricky because the seams have been pressed toward the A/B piece. So the seams are not butting up to each other, but rather are pressed in the same direction. This makes that area a little more bulky (but not too bad) and if you aren't careful the two seams will 'slip' and not line up properly. Pressing in opposite directions 'locks' those two seams into place.
There are many ways to secure the seam before you begin stitching. Of course, you can use pins...or forked pins which straddle the seam and secure the critical area. Or you could use clips to hold everything in place, or even a dab of basting glue in the seam allowance.
Once you have stitched the seam, check for proper alignment. If it isn't quite as perfect as you would like....try unpicking a few stitches before the mistake flub and a few after the flub. Sometimes you can set your seam again and stitch over that area a second time. This saves you from having to take out the entire seam.
Stitch all the blocks for Row one, Row two, Row three, etc. in this manner.
All of the seams in Row one will be pressed in one direction. The seams in Row two will be pressed in the opposite direction. Now you can 'lock' the seams between blocks for Row one and Row two.
Add each row this way and before you know it, you will have an amazing Flowering Snowball top!!!!
Keep posting pictures on instagram with the hashtag #floweringsnowballalong
and the Flickr page!
But it can't be all about Flowering Snowballs....so today I worked on a little something different...
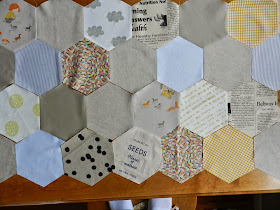
I turned the volume down a bit and machine pieced a few hexies!
What are you stitching this week?
happy monday
mary


Low volume hexies. How lovely : )
ReplyDeleteLots of great tips. I'd never thought of using glue to help line up seams, and Flub is a new word to me. I'm always impressed by people who machine sew hexies.
ReplyDeleteThank you! It'll be a long time before I do this step. (I keep editing out blocks, and I plan to make 100.) But I've been wondering how to get the seams to line up when they're all pressed in the same direction. Glad it's easy to fix the flubs.
ReplyDeleteThanks, I'd better get moving. I only have 3 blocks made.
ReplyDeleteExcellent info...I think I pressed my seams open...oops...pressing directionally by row would have been a help :/ I did remember your advise for just unpicking a few stitches and tried that to pretty good success! Thanks so much Mary!!!
ReplyDeleteI feel so guilty the snowball is still on my too do list but will make an effort this week, popped over to flickr and felt so inspired seeing hat everyone has done, maybe mine will just be a cushion or something small.
ReplyDeleteLove that word "flub"! New to me too! No sewing but I did buy a piece of fabric in Bordeaux!
ReplyDelete