Followers

Friday, October 29, 2010

Quilt Festival...

Well, as I am relatively new to the whole blog thing  -  this will be my first entry to the Quilt Festival!  So I hope to complete this task as prescribed by Amy of Amy's Creative Side....I love the idea of sharing a special quilt in one place...so here goes.
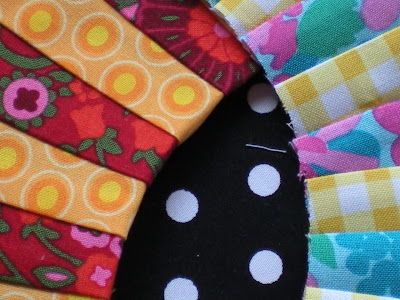
This cheery dresden plate was inspired by Sarah Fielke and her first Material Obsession book.  I loved making this quilt because it combines a traditional quilt block with very modern elements of color and design. 
I prefer using bright colors in my quilts and with this quilt I was able to use these fabrics to my heart's content.  The blades were machine pieced and the entire plate was hand appliqued to the background fabric.  The extra large center was also hand appliqued.
While I have hand quilted for years...this was my first experience with using perle cotton.  And I found my new obsession!  
I absolutely love this quilt and I am so glad I took the time to make it...thank you, Amy, for giving me the opportunity to share it with all of you!
Share your quilt by visiting Amy's blog to find the details on how to participate!  


Happy Halloween!!!!!

Monday, October 25, 2010

What a Wild Weekend....

We had a fun, wild weekend!  My sister and I - along with husbands and one child each - took my mom to The Wilds for her birthday!  It was truly amazing!  As my mom said, it felt like being on safari....not that any of us have ever been...but it was amazing.....
Aren't these guys cute....they look like they are posing for the photo!
Wild horses from Mongolia....we sat in an open-air bus and the animals were very close....
Lots of animals to see and lots of fun...it was a lovely day!
The day before our trip my sister and mom spent the day in Holmes county...and visited a shop recommended to me by a quilting friend/customer of Sew To SpeakMiller's Dry Goods is a must see stop if you are visiting Charm (I fell in love with Charm years ago on a road trip with my husband.)  So Charm and Miller's is on my to-do list for this Fall!
I am still chugging away on the Gypsy Kisses quilt, but took a break today to whip up this sweet little lamb....

You can download your own pattern from The Pattern-Bee site..he is very quick and easy....I need to add a ribbon around the neck...but I think it would make a cute gift or even a pincushion!
Happy Monday!
Mary


Wednesday, October 20, 2010

Monday, October 18, 2010

Foundation Paper Piecing....

Here is a quick how-to on foundation paper piecing....
This is a great method for piecing when you have irregular shapes or edges cut on the bias...piecing in this manner results in perfectly pieced blocks.
I am working on the pickle-dish (Gypsy Kisses) quilt from Material Obsession 2.  The instructions call for light and dark strips - 2.5 inches by 5.5 inches....
I copied the pattern on foundation paper...you may copy by hand or run it through the printer as I did....
My darks are marked on the foundation paper...I will place my strips right sides together to the back of the foundation paper...with the dark strip closest to the paper...my strips will extend 1/4 inch beyond the end of the foundation paper....
I will stitch directly on the first line of stitching drawn on the foundation paper...in this pattern the arcs will be appliqued on to the background fabric...so I will begin my stitch line at least 1/4 inch above the paper edge and end 1/4 inch below the bottom edge....shorten your stitch length so that the stitches stay secure when you remove the paper...
First finger press the top strip of fabric back and then iron press...now fold the paper back at the next line of stitching...and trim the excess fabric 1/4 inch from this line...place the next strip of fabric with raw edges together and right sides facing...fold the paper back down to reveal the next stitching line....and stitch again on this line....
Continue until you have completed the entire template...then trim 1/4 inch from the last edge...I then trimmed my arc leaving 1/4 inch at the top and the bottom...so I have enough to turn under for applique...

So there you have it!  A couple of tips....you will need to keep the needle you use with paper piecing separate from other needles - this will dull your needle...and there is a lot of up and down to trim and get to the ironing board - so I would keep your mat and rotary cutter close as well as the ironing board and iron.
Hope this helps if you have ever had the notion of trying Foundation Paper Piecing!
Mary


Sunday, October 17, 2010

A Pile of Pincushions....

                     Shhh....it is a secret......            


Ha!  I love this...it looks like the piggy salt shaker is singing to the guitar playing dog!
So much fun making pincushions and giving pincushions....
Mary 


Wednesday, October 13, 2010

Out of the Moth Balls...

Or, rather, the cedar cedar chest...I pulled out this variation of Log Cabin called Barn Raising.  I made this quilt in 1993 (yikes!) but it is still so relevant.  
A very traditional pattern and hand quilted using traditional techniques (no perle cotton here)
Solid cottons...
The borders are magenta and black with this striking red and black saw-tooth border...and I used black centers in each block rather than the traditional red...I was such a rebel! Ha!
Glad I pulled this out....it makes me happy to see this quilt again.  And goes to prove...everything old is new again!
Mary
 

Tuesday, October 12, 2010

Sneak Peek....

Like so many right now, I think I am suffering from a little virus....arrrrgggg....
But I still have enough energy to work on a few projects (takes more than some durn virus to keep me down!) ....here is a sneak-y peek-y....


Mary :)

Sunday, October 10, 2010

Straight Line Quilting....

Okay, I know the first image has nothing to do with quilting, but it does help with the motivation....
I have a weakness for candy corn...and it is October....right?
So back to straight line quilting...I am quilting a baby quilt put together by a student of mine...and I have another class getting ready to quilt - so I thought I would post some tips on straight line machine quilting.... 
I suggest using the same thread in the bobbin as the top thread if you have any issues with tension.  If you use the same bottom and top thread, neither the bobbin or the top thread will show through....problem solved.
I like to use quilting needles - although quilting needles are not the only needles I use in quilting and some people prefer top stitching needles...but at least always use a new needle....
Loosen the presser foot to about 1,  I like to lengthen the stitch to about 3.5  and I would recommend using a walking foot...

I attach the arm on the right side of the walking foot and adjust to the distance I would like between the rows of straight line stitching....
I begin the first row by placing masking tape along the line I want to quilt...
Before you begin stitching decide if you are going to lock your stitches by taking a couple of back stitches or if you will leave a tail of top and bobbin thread...thread a needle with the tail...knot and bury the knot....this takes a little more time and you have to remember to leave a tail at the beginning and ending of each line of stitching.... 
Roll the side of the quilt before feeding it through the throat opening on the machine...if you are quilting a larger quilt, these clips help to keep the rolled section of quilt out of your way...they don't really help that much with a baby quilt...
Use the arm to follow the previous line of stitching.... 
I try to always let the machine do the "work"...so no pulling or shoving the quilt through as you are quilting...go slow when straight line quilting and you should have lovely results with beautifully even stitches... 
I hope this helps...now back to that candy corn and stitching :)
Mary

Monday, October 4, 2010

Yo-Yo Delight!....

Honestly, is there anything more delightful than a pile of yo-yo's.....
The icing on the Stashbuster cake, is a yo-yo at each point!  What could be more whimsical and happy?  

The quilting is complete and I am hoping to have all my yo-yo's added and the binding on in the next day or so...more pics to come....
Mary