Followers

Monday, January 31, 2011

Add Some Dashing Sashing????

Sometimes it is nice to add sashing to a quilt....often I will add sashing when I want to define a block....add some colorful corner squares and you can transform the look of a quilt....
So here is a little demo...hopefully it will help if you are adding some dashing sashing of your own...
Begin with a block....
or two....(for my purposes today I am just sashing a little two block quilt)...
After sewing my blocks...I squared them up to 8.5 inches...a little wonky of course...


I decided to cut my sashing strips 1.5 inches....I will need a sashing strip for the left side of block one and between block one and block two and then one for the right side of block two....then I will need two sashing strips for the top of the row (one for each block) and two for the bottom of the row (one for each block bottom)....so that is 7 strips in all....

So I cut my sashings 1.5 by 8.5 inches long...remember my block is 8.5 inches square....so I want the length of my sashing the same size as my block...now for my little colorful corner squares I need 6 and they will be 1.5 inches square...the same measurement as the width of my sashing....these little squares will go on the ends of my sashing strips...

Next I will sew a sashing strip between block one and block two....then I will sew a sashing strip at both ends of this row....so one strip to the left side of block one and one strip to the right side of block two...
This is my very little row one!!!!
Now I want to add sashing to the top and to the bottom of my one and only row in this little quilt....if you are doing a quilt with more rows you will add sashing strips to the top of each row and then on the last row you will add one to the bottom as well....

Begin the sashing and corner square strip by sewing a corner square and a sashing strip together....sew another corner square to the other end of the sashing strip....then another sashing strip and finally another corner square....(this strip can get very long with a larger quilt)
You will make as many of these strips as you need to go between the rows and at the top and bottom of the rows....
Sew the strip to the top of the first row...it works out lovely if the corner square seam butts up perfectly with the sashing seam between the blocks.....


And that is how to add some dashing sashing!!!!  Hope this helps ;)
Mary

Thursday, January 27, 2011

LOVELY.....

Molly did a little knitting.....
Made this sweet pillow for me....I love the look of knitting....the softness and texture....
Love it ;)
mary

Wednesday, January 26, 2011

Robbing Peter to Pay Paul Improv.....

Wow!  Had an epiphany this morning so worked up what may be a very fun quilt on my list....
One of my all-time favorite blocks is Robbing Peter to Pay Paul...my only problem is the large expanse of space in the center for just one fabric....
So the answer may just be to "liberate" this block....


Then of course add some fantastic perle cotton stitches...


Yep...definitely kicks RPTPP up a notch....
Excuse the wrinkles....you can't imagine what this little block went through this morning ;)
The template for this block came from Marti Michell.

Happy Hump Day!
Mary

Monday, January 24, 2011

Curves!!!

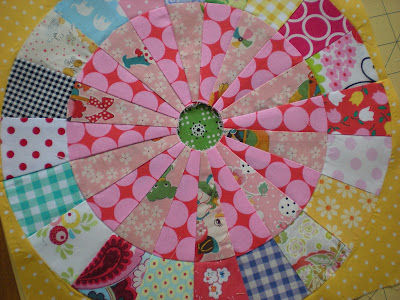
It is difficult to do circles without working with curves....I actually enjoy curves.
Working with curves makes me nervous in the beginning and then as it comes together I breathe a sigh of relief and smile....kind of like riding a roller coaster! 

I have found the big trick with curves is using lots of pins....


Find the center of your two pieces and pin the centers.  Match the both ends and pin...then pin, pin, pin in between!!!
I have found that it is easier to stitch curves with the concave piece on top and the convex piece on the bottom....


Shorten your stitch length and just go slow....somehow it all works out just fine...


So one block of the Eloise Quilt is finished....I haven't planned the quilt out...it is just evolving


I guess by not committing my ideas to paper....I am not locked in...I can change my mind.  How do you work out quilts?  Do you work it out on paper or just go with the vision in your head?


My vision is telling me this block will need to have a GREEN center!  Yum!


Hope you are having a great Monday!
Mary  

Thursday, January 20, 2011

Building Borders....

No...not North or South, but East and West!  This quilt has piano key borders on the sides and just background borders on the top and bottom.  I love a piano key border....obviously...I used it here, here and here.  They are easy, but make a big impact...I love chosing fabrics for a piano key border that give that POW !!!! 
The keys are 2" X 5" ....the fabrics from the arcs...

Chain piecing makes this go much faster!

While I putter away at the 3 projects I have going, my mind keeps wandering back to a couple of single blocks I did....each are different quilts...

But both are circles...I find that I am very drawn to circles....
This one I made a couple of blocks then embroidered one and made it a pillow for my bed ;)


So how about you?  Are there certain blocks or shapes that you are drawn to? 
Mary 

Tuesday, January 18, 2011

An Award!!!! For Me???

Yes, it is true!!!  I have been awarded the Liebster Award and I was nominated for this honor by Monika :)  If you have not visited Monika's blog...hop over and check out her adorable work.  She is very talented...her quilts and pillows and little pouches are fantastic!
The Liebster Award is given to blogs with less than 300 followers and every award recipient then nominates 3 more award winners....sound like fun? 


So my first nomination must go to my friend Julie!!!!  Julie has become one heck of a quilter!  I met Julie as a student in one of my quilting classes...and before I knew it Julie was quilting everything in sight and started her own blog.....Go Julie!!!  Her blog is Being Me & Sippin' Tea... 

My second nomination......Trish from Notes of Sincerity....Trish and I have communicated via email and blog mail...she has such a happy blog!  Her projects are always fun to follow...so pop over and become a follower!

And my final nomination is Gemma from Roses and Gingham!  I just recently discovered her blog.  It is a feast for the eyes!  She is a very clever and crafty girl!

Thank you again Monika for the award!
Mary  

Monday, January 17, 2011

Inspired by a name....

Been thinking a lot about names lately, probably because I know several folks expecting munchkins soon...so we have been throwing names about.  I love my mother's name and have gotten the notion to design a quilt that will fit her name...of course when I think of my mother's name, I also think of her parents and why they decided to name her this.  I think of her humble beginnings.  So a quilt bearing her name would have to have elements of her personality. 


So here are the beginnings of the ELOISE quilt....humble beginnings...for and inspired by Eloise...

She loves Liberty fabrics...so I have to throw in some Liberty....she loves dots as much as her daughter.  I did not always have such a love affair with dots.  As I recall, as I young girl I would turn up my nose each time she would look at a dress or skirt with polka dots....we have come full circle.


And I have to add a vintage feedsack...she grew up in South Eastern Kentucky...and life for her was not luxurious!  Although she would not say it was difficult....in fact, I am sure she would say it was pretty simple...

That is where I am for now.  Three works in progress!!!  geesh!!!
Mary    
               

Sunday, January 16, 2011

Puppies!!!!

Last night I worked on a special doggy for an adorable little man....turning 2!  I used the Moxy Doxy pattern from Badskirt Amy!  This is such a fantastic gift!  Last I looked you can order either a finished Moxy Doxy or the downloadable pattern from Amy's online shop....
All of the fabrics are from Sew To Speak...and they have an online shoppe as well.....

Who wouldn't love this cute guy?   Happy Birthday, Enzo!!!

Another cute puppy I know well, is having the best time with her new toy....

Yep...that's Mr. Bill....and he screams Oh NOOOOO!!!


And finally, I want to share with you the lovely view I have enjoyed over the last couple of days while I am sewing....

The only thing that would make it better is if these were for me!  But, alas, this bouquet is for the lovely Molly....
Lucky girl!!!
Hope you are having a wonderful Sunday!
Mary

Thursday, January 13, 2011

What Day Is It Anyway???

This has been such a weirdly busy day....for no reason really....and nothing much has been accomplished...except laundry and I don't think you want to hear about that.
I almost forgot to tell you all about the WIP Wednesday at Freshly Pieced....if you have a project in the works and it's Wednesday...add a picture here!

Since I really don't have anything new to show you, I thought I would show you bits of another applique project I completed many years ago.  This is a Baltimore Album Quilt and I do love this quilt....it is all finished except for the quilting.  Life got in the way and I haven't been able to connect with this quilt again....sigh.....


Mary

Wednesday, January 12, 2011

W.I.P. Wednesday....

Still a good deal of work to be done, but it is beginning to look like a quilt....
My apologies for the dark, fuzzy picture....our January days have been anything but bright....
Mary

Monday, January 10, 2011

Applique'.....applied

Now that all my arcs are finished...I have stitched a machine basting stitch (white thread) along the edge of the foundation paper before actually removing the paper...
Not only does this give me a line to follow as I press the 1/4 inch edge under, but I find this basting stitch (white thread) gives the edge a memory of sorts so that it turns under more easily...
Then I baste the entire arc to the lovely background fabric (Betty Dear) with a black thread...both the white basting stitch and the black stitch will be removed after the arc is appliqued....
Of course, in applique the goal is to apply the shape to the background fabric without the stitches showing....
I begin stitching from underneath the background fabric and come up slightly under the edge of the shape being applied and I just take a bite of the edge of the shape....
Then if I go back into my background fabric directly under the spot where I just took a bite....my stitch will be hidden....
I have found that if my stitch is forward of the edge of my applied shape as I take my needle back into the background fabric....the stitch will show.
All the forward movement will happen on the back of the background fabric...
Once all the arcs are applied, I will piece the rows together and then fill in the background sections (between the rows) using applique'......so it is coming right along.....

I had a lovely dinner last night with my sweet friends from work....it was my first experience with 
Indian Cuisine....yum!  I was delighted to discover they use a lot of potatoes...perfect for an Irish girl like me!  I had a fabulous time....thanks friends :)
Mary