Followers

Tuesday, October 18, 2011

Rolling On....Freezer Paper Piecing Tutorial....

Here is a little tutorial for piecing the arcs of this wheel with freezer paper....


Once I have made my arcs for each quadrant of the circle and added 1/4 inch seam allowance to the arcs and the outside corner....I transfer each template to freezer paper {drawing on the paper side not the shiny side}....


To my freezer paper arcs I add lines to separate the segments.  Then I score the lines with the back of a seam ripper so that the paper is easier fold.  Just be careful not to press too hard when scoring...you don't want to cut the paper.

    
To prepare, I reduce my stitch length to about 1.7.  By reducing the stitch length I can be confident my stitches won't pull out when I take the paper off.  I get my iron ready....hot iron, no steam.  And the fabric for the segments.  The fabric pieces need to be at least 1/4 inch larger than the segment on each side.  

   
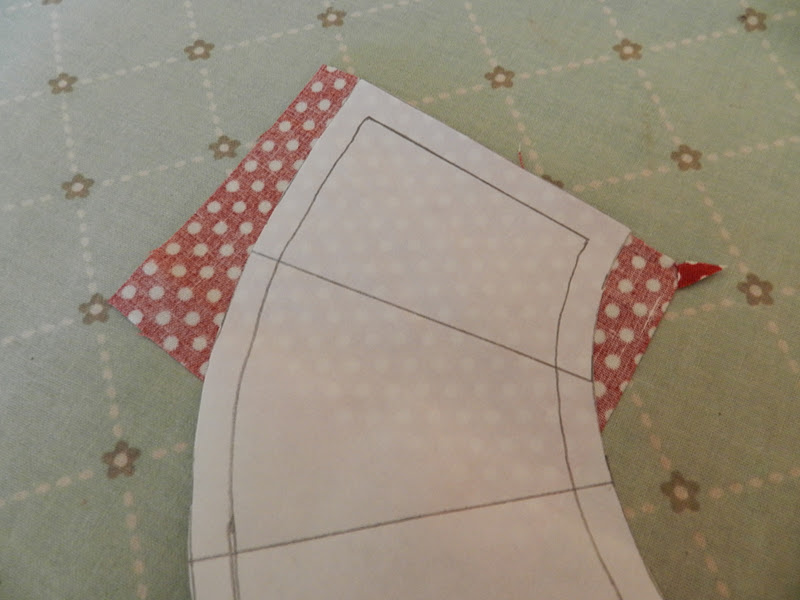
Begin by taking your first fabric and placing it with the wrong side toward the shiny side of the freezer paper.  The straight edge of the fabric can be even with the straight edge of the template {because I have added my seam allowance to my template}.....take this to the ironing board and press on the paper side until the paper  sticks to the fabric.


Fold the paper back at the next line {this will be the line indicating the next fabric}.....
Take this to the cutting mat and lay the acrylic ruler at the edge of the fold with a quarter inch of the ruler laying over the fold....cut a 1/4 inch beyond the fold and this will be your seam allowance.


Take the next fabric and place it - right sides facing - against the first fabric which is still pressed to the freezer paper.....sew a quarter inch seam allowance.  The stitching line will be right next to the fold in the freezer paper.  Do not stitch on the paper - just next to the fold in the paper.  I begin stitching about 1/4 inch before my template and 1/4 inch after the end of the template.    


Finger press the second segment open and then press with a hot, dry iron on the paper side.  Pressing out the second fabric and adhering it to the freezer paper. 


Again, fold on the next line, cut off the excess fabric to leave the 1/4 inch seam allowance and repeat the process with the next fabric.
Continue until you have competely covered the template with each fabric...


Simply trim all around the edges of the template {I have included my 1/4 inch seam allowance in the template so I don't have to add a 1/4 inch beyond the template}


After all arcs for a quadrant is finished you can sew them together following some simple tips for sewing curves....
find the center of the curves and finger press
place the concave piece on top - so you are looking at the concave piece as you sew
pin the center and the ends - and in between if it makes you more comfortable


The outside corner is treated the same way....


With this method you can reuse the freezer paper several times since you are not stitching through the paper.
Hope this helps.....
Now I think I will work on a little quilting :)


happy tuesday!
mary

Monday, October 17, 2011

Big Wheel Tute

Here is a quick tute to get you started on a big wheel of your own....

How to make a wheel....

Decide how big you want the finished block to be.  Mine will be 16 inches finished.

Cut a piece of paper that measurement.....16 X 16


Now my large outside circle will be 15 inches in diameter.  So that means the radius is 7.5 inches.  I take a piece of string and tie it to a pencil...cut so the string from end to pencil measures 7.5 inches.....

Find the center of my 16 inch square.....
And hold the end of the string in the center while drawing a 15 inch circle with my pencil....


I did the middle circle and the very center circle in the same manner.  The width of the larger circle is about 2.5 finished.  The same for the middle circle - 2.5 finished.  And the smaller center circle is about 2.5 finished.  For each of these I have not added my seam allowance yet.

I cut the square into four equal quadrants.  
Next I will cut my quadrants and arcs apart.  So now I will have 4 pieces for each quadrant.  The center circle, the middle circle, the larger circle and the outside corner piece {this makes your circle a square }  Each piece is treated the same.  Add 1/4 inch seam allowance to each side of each piece.

So for the center, I added a quarter inch seam allowance and now this is my template.  I like to add my seam allowance to my template so I don't have to remember to cut a quarter inch beyond my sewn piece at the very end.  I can just cut along the edge of my paper....


I copy the template onto freezer paper and then add my lines for each of the pieces of the wheel.  I wanted my wheel to look scrappy, so my lines are not evenly spaced....just random.  But they do need to be more than 1/2 inch wide at any point so the segment does  not disappear in the seam.


With freezer paper I can simply score my lines, iron the waxy side to the wrong side of my fabric, fold back on the line, sew, press and cut my 1/4 inch seam allowance.  I like to use freezer paper because it can be used several times before you need a new piece.  

I would be happy to do a tutorial for freezer paper piecing using this method if any of you would be interested....

Hope this helps if you decide to make a wheel of your own!
mary

SWEEEETTT!!!!

This was my ride yesterday!


AWESOME!!!!  Mike and I both had turns as passengers and, l must say, this car draws attention....


Buckle up!!!  


What a way to start the day....
But it can't all be expensive sports cars and thrilling rides.....
I also relaxed a bit with a new magazine and some hand quilting....
I am only able to show a little peek
because this is a secret project....a fun little swap :)


Hope you had a nice weekend!
mary

Wednesday, October 12, 2011

Big Wheel Keep on Turnin'.....

Proud Mary keep on burnin'.....
Recently, I purchased a Kaffe Fassett book called Passionate Patchwork...
     I fell in love with a quilt on the first few pages.  I thought it was vintage, but it is not.  And unfortunately the pattern is not in this book.  I am not sure if there is a pattern for this particular quilt....


This is so me!!!  Circles..spokes....print and color!!!! 

So I have decided to try to draft one on my own....
I drafted the arcs with my trusty freezer paper....


 There are three sections of wheels within this one large wheel.  So lots of folding, sewing, pressing and cutting....

   
And this is my version of the wheel....


If I am crazy enough to continue with this, I will make the center section with less spokes....the center is very thick where all those spokes meet.
That has been my distraction for the last couple of days...
 Flanders has been distracted by a chubby little ground hog {my kids called them grass hogs} running across our yard.


     She looks serious, doesn't she?
What has been your distraction today?  Hope it hasn't kept you from sewing :)
mary

Monday, October 10, 2011

Sounds of Silence....

Sorry for the silent blog of late....
No....I wasn't at the Sewing Summit, but I did have plenty of sewing with friends....it has just been a very busy weekend!  I would have loved a visit to the Summit, but college books {and fabric buying} are priority at our house so no trip to the summit this year :)

Little by little, I have been building up my collection of Japanese fabrics.  Now I am ready to create my own 'fabric' to use in Christmas gift making....

     
This coin purse will be a great little gift to tuck into a bag.....


Just an easy two piece purse template with some fun raw edge applique....

   
Add some fun lining fabric and batting between the layers....


A sweet button or a snap and there you have it!!!

  
Hope you had a wonderful weekend - did you go to the Sewing Summit...or maybe sew with friends :) 

Happy Monday!
mary